*Affiliate links provided for your convenience. For more info, see my full disclosure here.
Note: This is NOT a sponsored post! Also, please excuse the horrible pictures. The upstairs hall has zero natural light and is dark and shadowy. Most of the pictures in this post were taken by my phone or worse…at night with my phone. Ugg! 😉
Guess what? I painted the stairwell all by myself! Without hiring a painter! I’ll admit that I’m ridiculously proud of myself for accomplishing this. I have droned on and on to my husband about it multiple times. Basically, I geek out about it every time I go up or down the stairs. You’d think I just landed a rocket on the moon. 🙂

In our old house, we took one look at the high stairwell and called our painter. He was reasonably priced and did a fabulous job! No regrets there. However, this time around, I knew that the money to hire a painter would not be in the budget for a long, long time. My options were either wait another year or two or figure out how to paint the stairwell myself.
I’ve been working on a gallery wall for my upstairs hall and didn’t want to hang it on dingy, old paint, so the gears in my brain started turning. I remembered a little edger gadget* I picked up on a whim a few years ago that I enjoyed using. I had recently noticed the new models were improved and could accommodate an extension pole. That was my light bulb moment! Behold… the $5 gadget* that allowed me to paint my stairwell by myself without hiring a pro or needing to buy a special ladder for the stairs!

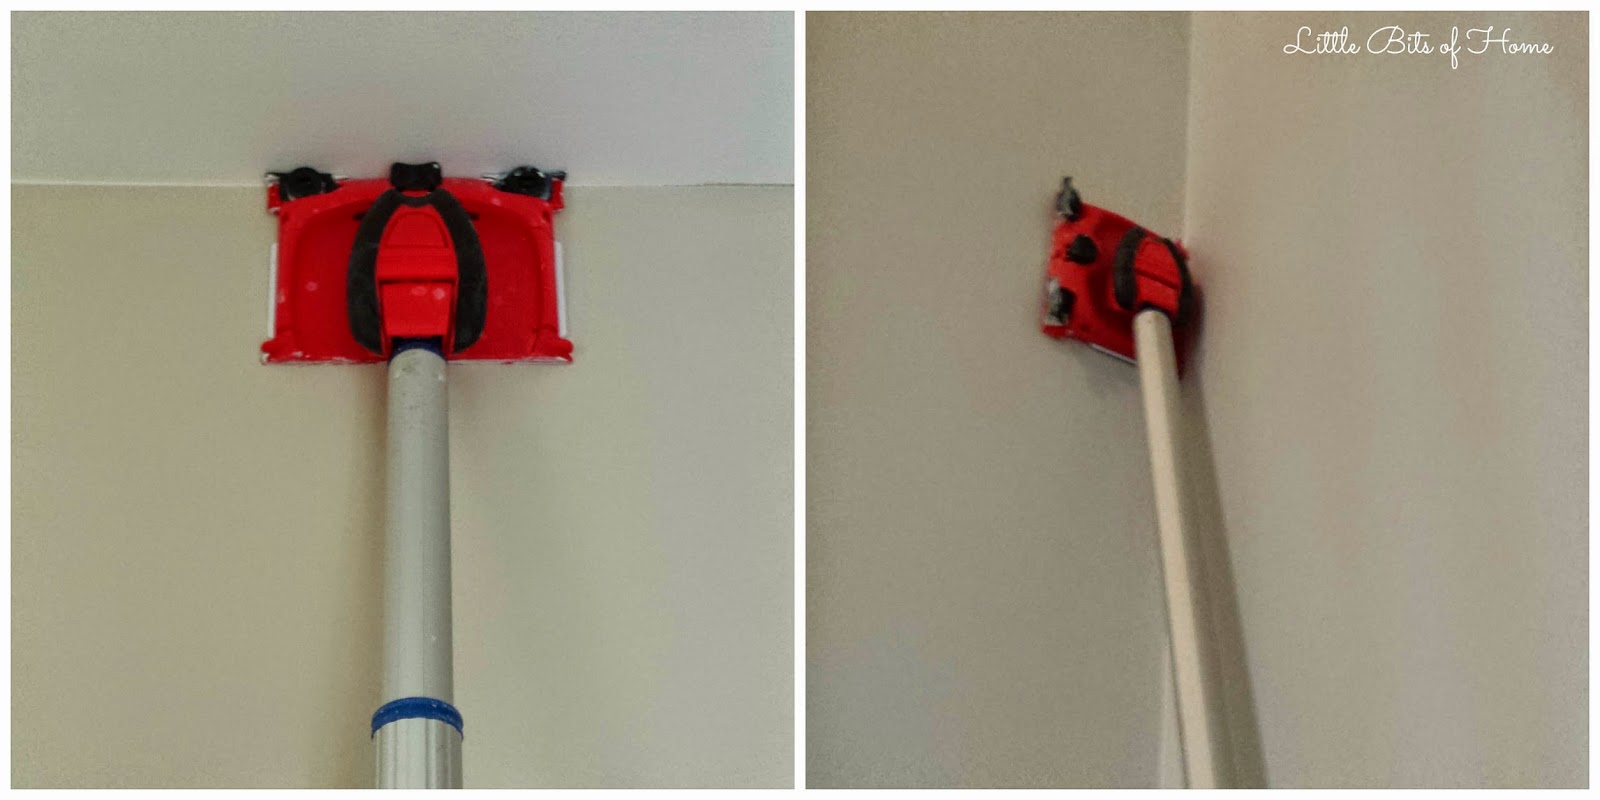
Not only can the new model attach to an extension pole, it swivels all around and now it has two little guards at the top that keep the paint from smearing on the ceiling, so there is no need for painters tape! My biggest holdup with painting the stairs was that it was too high (we don’t have a stair ladder) and I wouldn’t be able to tape off or cut in. But, with this little gadget, I was able to cut in without needing a ladder or tape!
I taped off the baseboards and door frames then cut in the bottom portion of the walls with my paintbrush. Then, I used the edger to cut in the top edge of the walls, as well as along the sides of each wall. When I did the sides, I turned the edger backward so that the guards were out of the way and I could get paint as close to the corners as possible. Like so…
A couple quick edging tips:
-Practice a few times first to get a feel for the amount of pressure to apply to the edger and how much paint to use. I edged the walls in my hallway first, then edged the stairwell once I was plenty comfortable with the edger. It’s very easy to use, but it was helpful to get really comfortable with it before using it while standing on the stairs with it extended 8 feet above my head. 😉
-The guards flip up so they are out of the way when you dip the edger in the paint. Occasionally, if I got too much paint on my edger, when I’d flip the guards back down, they would get a bit of paint on them that I’d need to wipe off. No biggie, but something to be aware of.
-I found that after I dipped my edger, it was helpful if I ever so lightly ran it across the edge of my paint pan to get off any excess paint.
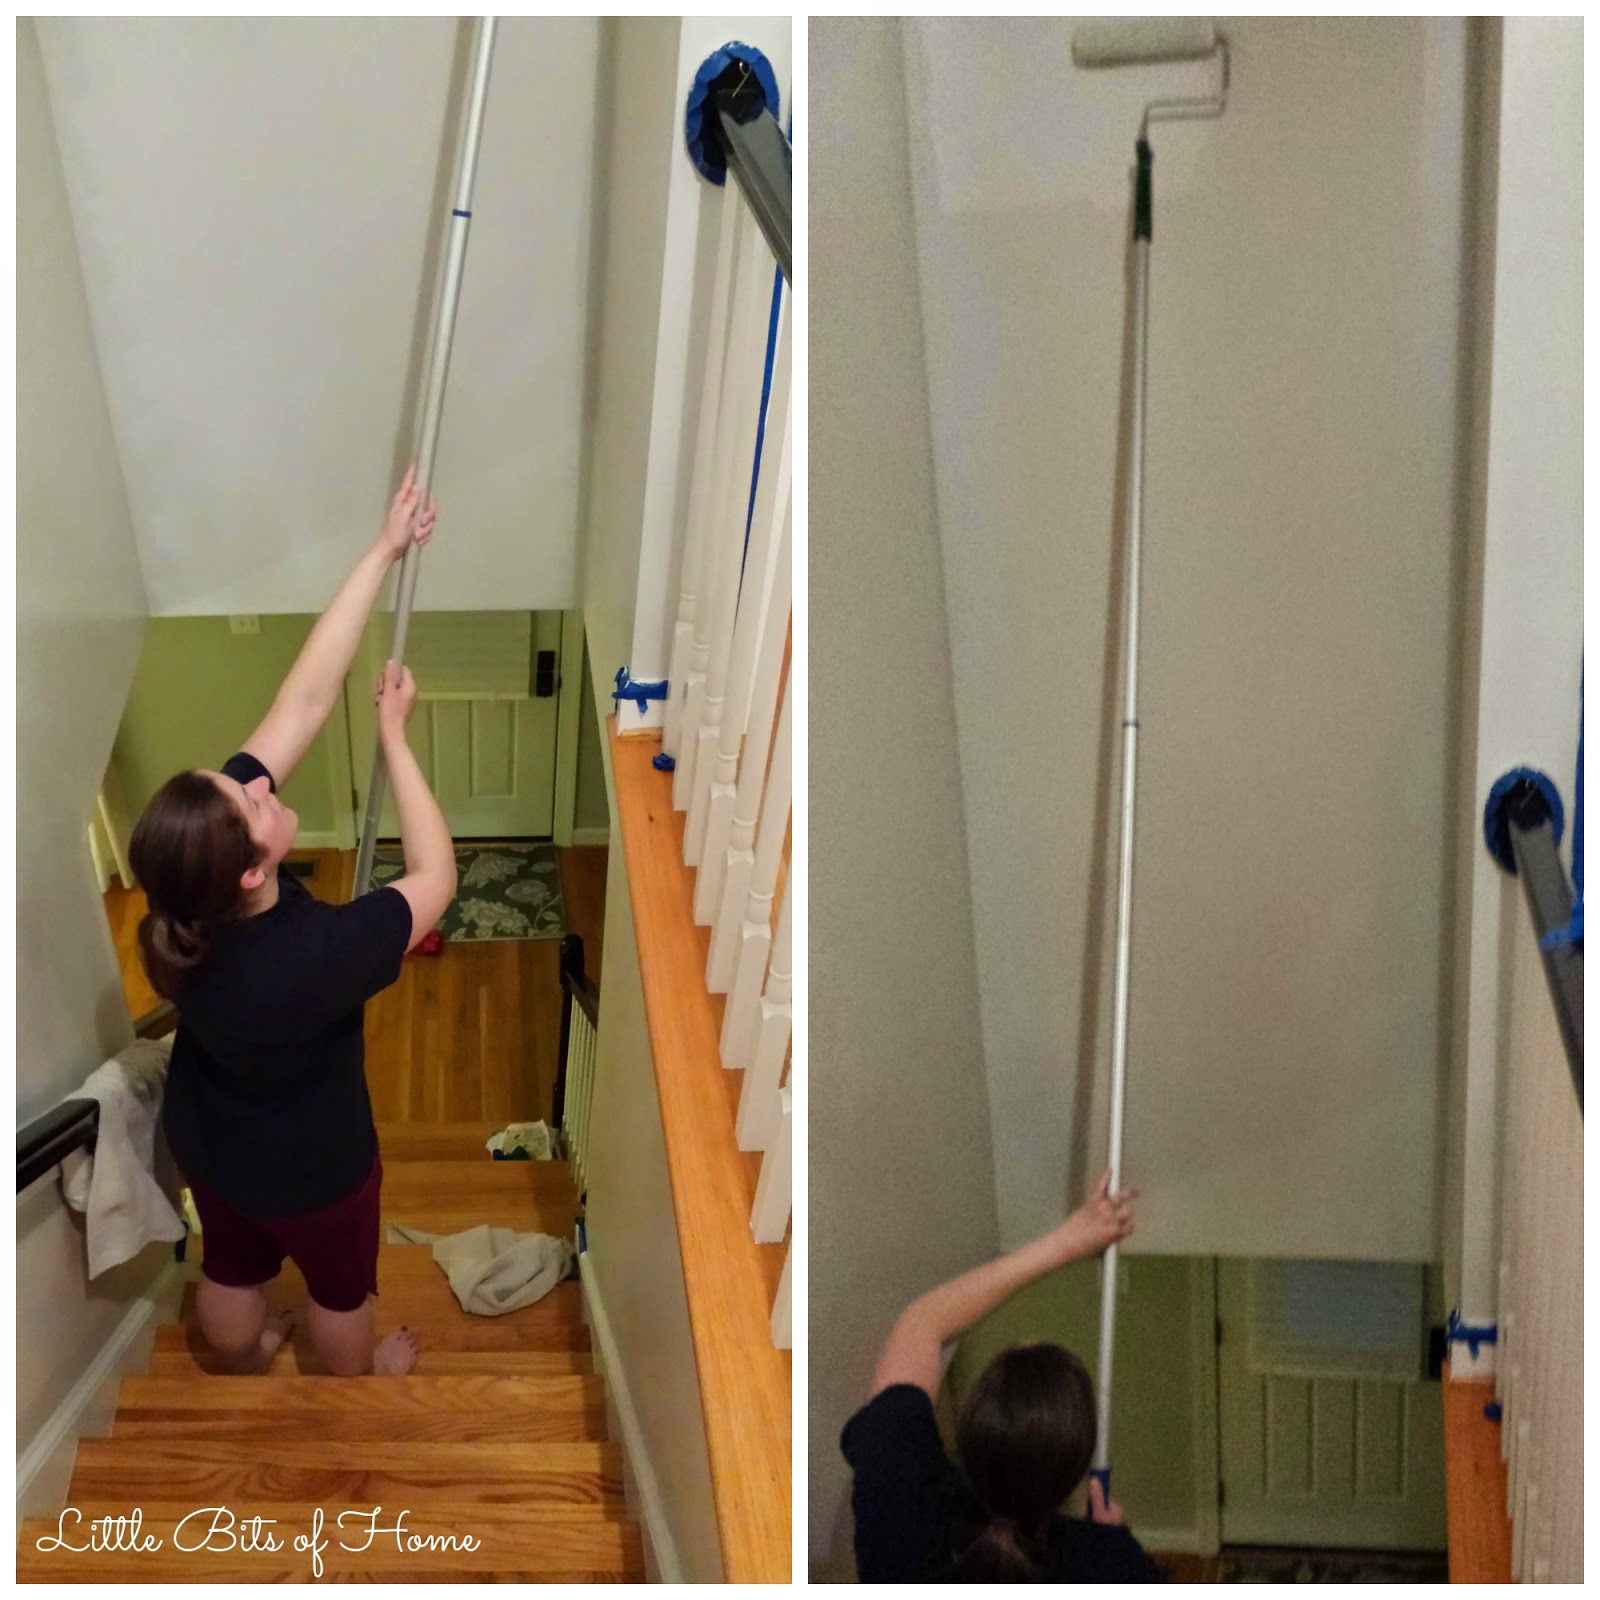
After the cutting in was done, I stood on the stairs or on the landing and rolled using an extension pole. You know you’re insanely jealous of my painting attire. 😉
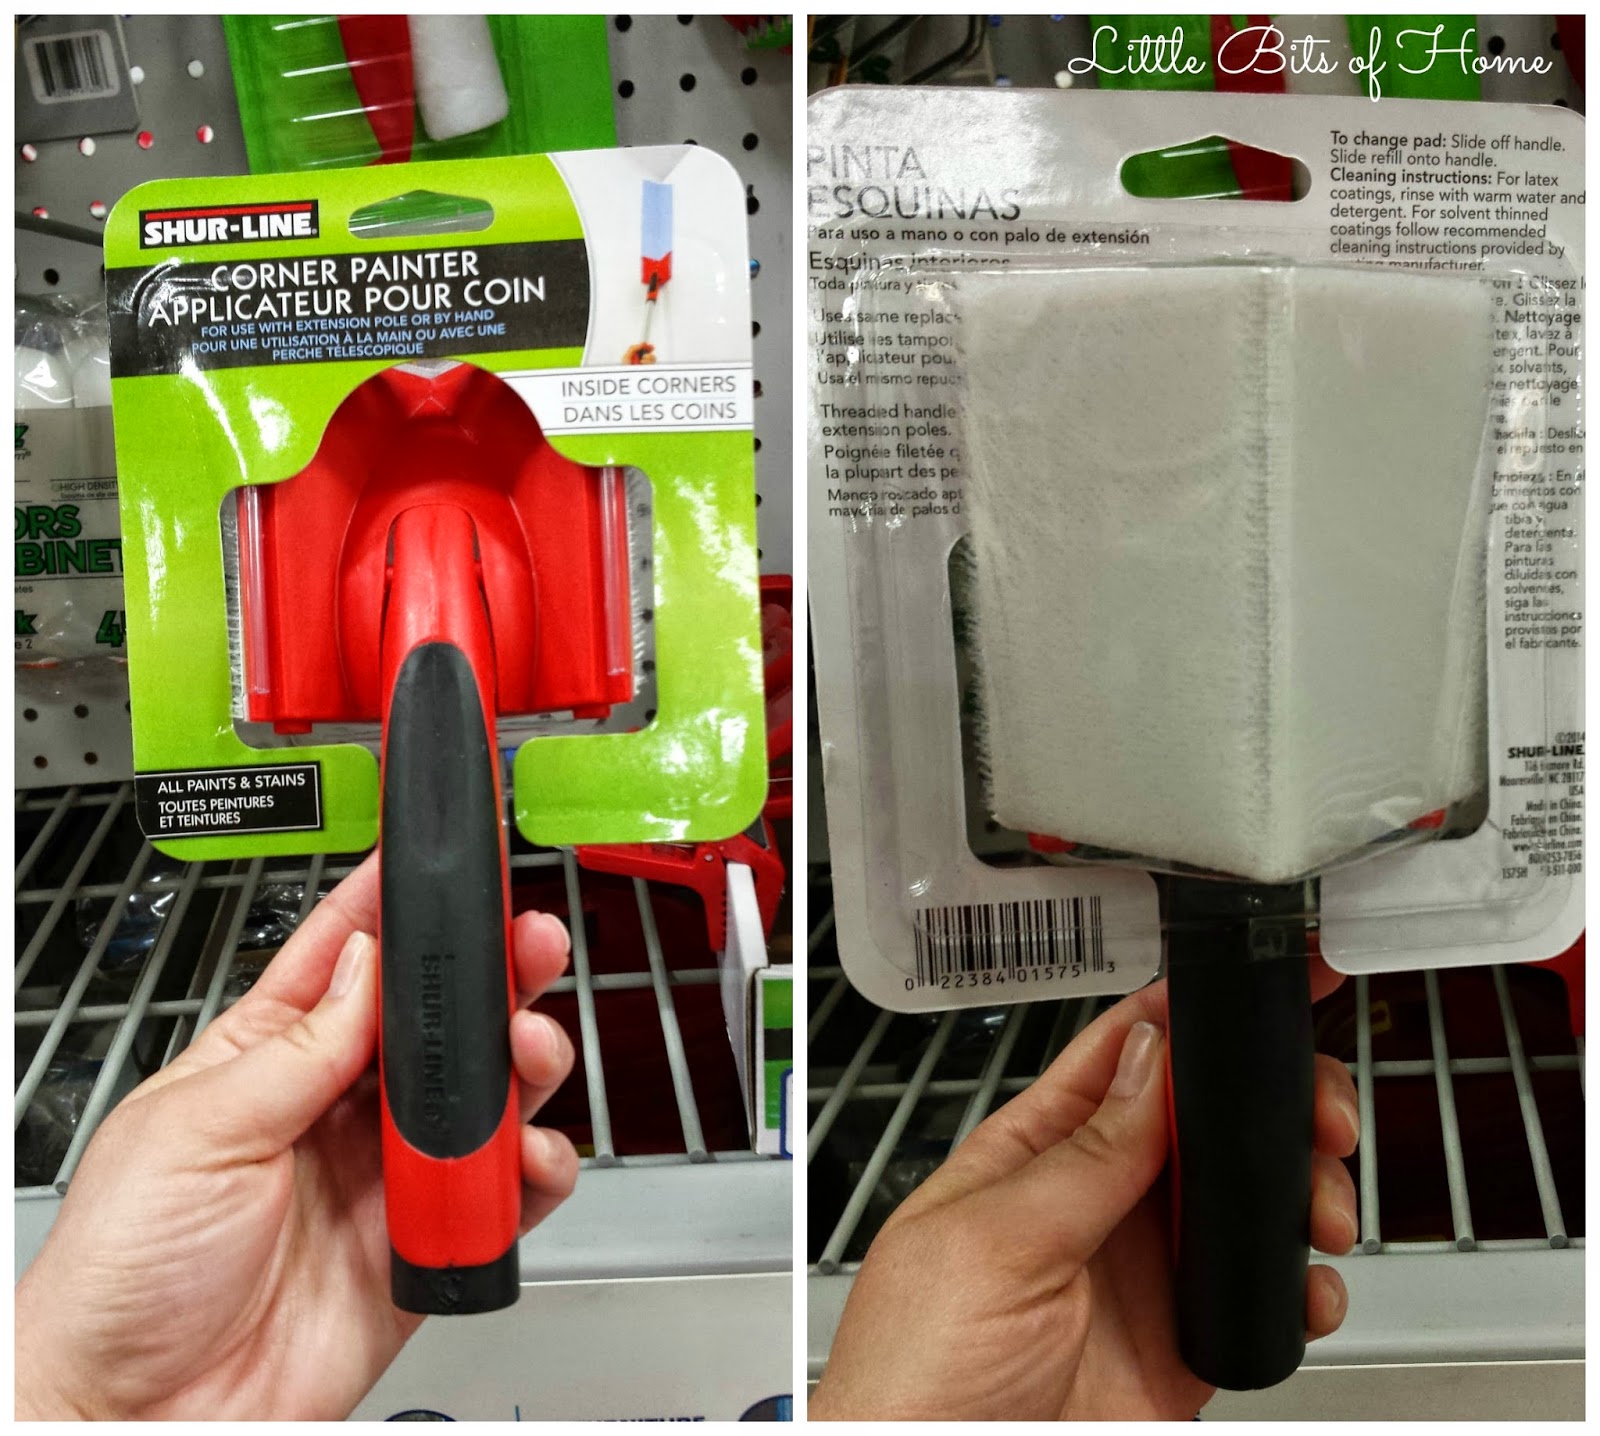
For the corners, I got really high tech. I duct taped my paintbrush to my extension pole. I told you it was high tech! Haha!

If this method is a little too, um, “rustic” for you, look what I found! It’s a corner painter* made by Shur Line in the same line as the edger! And, it can attach right to your extension pole! It was $5, so I passed and just did my duct taped paintbrush thing. I know, I’m cheap. But, either way will work!
I won’t lie, it was labor intensive and a bit tedious, but it saved me a bunch of money and allowed me to check the stairwell off of my list!
I used the same Benjamin Moore Gray Owl paint color I used in the living room, but I had it lightened by 25% because the hallway is so dark. I didn’t want it to look really dark with all the shadows. Lightening it by 25% was the perfect amount–it appears to be the same color as the living room, even with all the shadows.
Ready for a little before and after action?
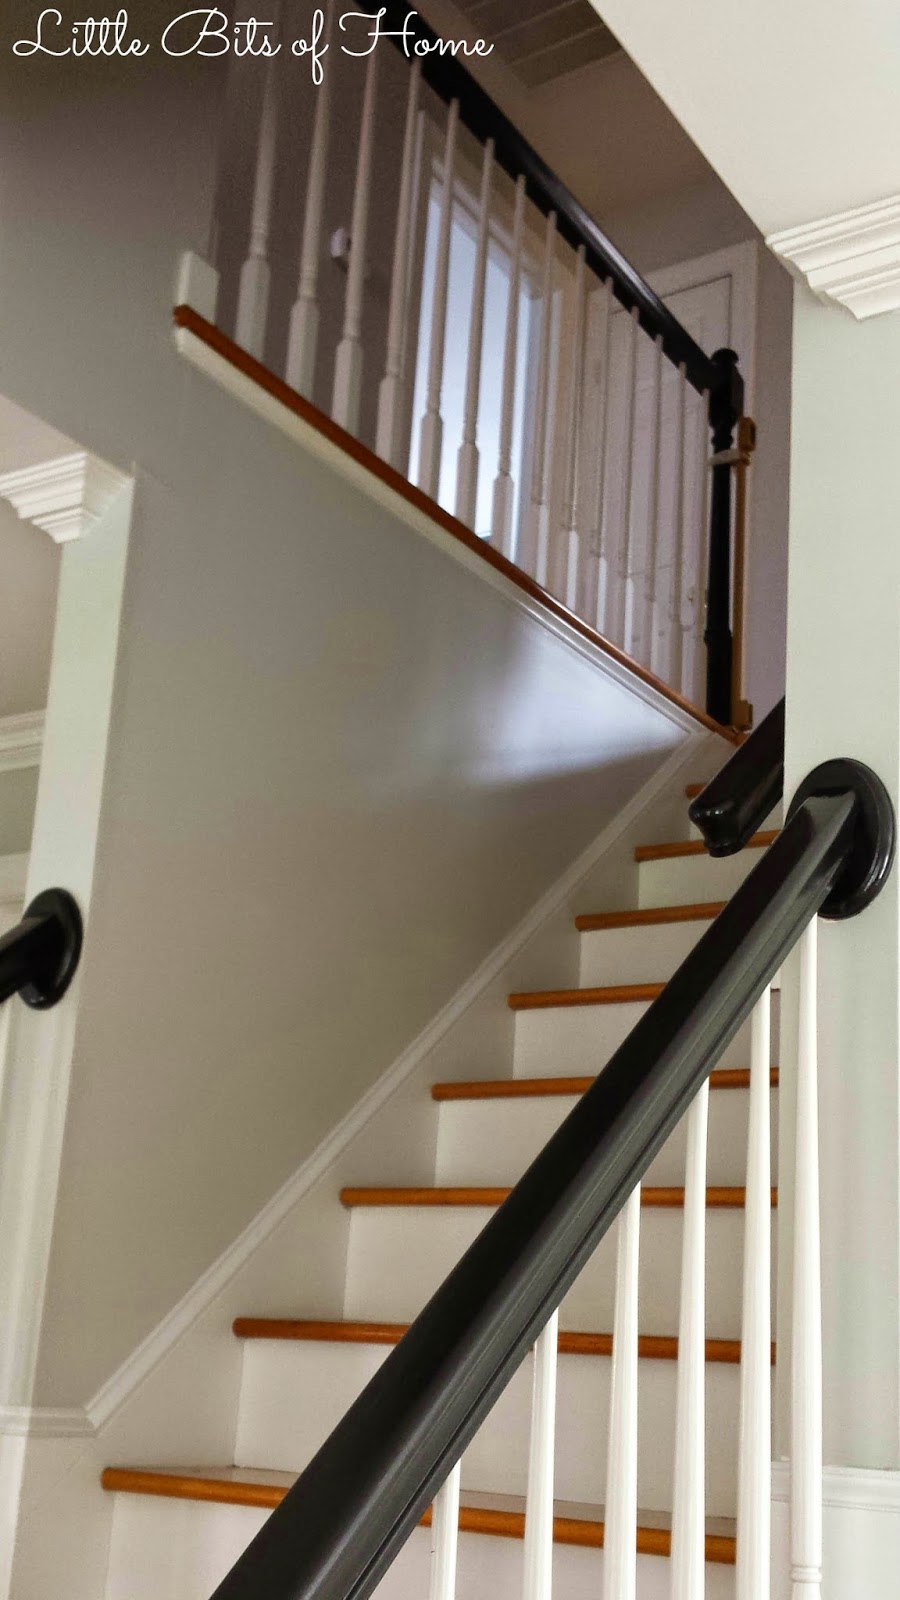
Before…

After!


What a perfectly timed post just doing our stairwell too!
That turned out great! I love your color!
What a beautiful home…. and your paint job turned out so nice. Great job… and enjoy that sense of accomplishment… I love that part too. 🙂
Amazing – will definitely be trying these methods out when we finally tackle our hallway…unfortunately we have quite a few rooms to go before we get there. It turned out SO good though. Bravooo! 🙂
Duh on me — I mean, I know there are such things as edgers but did I think of getting one for myself — NO! OMG, thank you for the reminder, for I am facing some painting here — a dark blue bedroom that has to go, but the ceiling, which is painted white, is done perfectly. The thought of going up and down a ladder to tape off the ceiling AND all the trim work — yech! So I've been putting off the tedious chore, and cringing every time I go into that bedroom. I'm going to look for the edger today online and get one ordered pronto. As for duct-taping the brush to the pole — a brilliant and inexpensive solution! The paint job looks great, and I love that color.
Great! I just added a few more tips about using the edger! Good luck!
Thanks! I tried literally 8 or 9 different gray samples before I found this one. I'm really happy with it!
Thanks for your kind comments! Of all the projects we've done, this is one of the ones I'm the most proud of. Maybe because I didn't actually know if I could pull it off? Haha!
Yes, taping and cutting in high ceilings= no fun! Hope the edger helps! I just added a few more tips about using the edger to my post! Good luck!
I so know how that goes! We have three bathrooms and the dining room on our list next. 🙂 I just added a few more tips to my post about using the edger in case that helps. Good luck & thanks for the encouragement!
I love the paint color you chose! and your high tech idea! 😀
WOW! We have been putting off painting our ugly stairwell for 10 years now because we thought we would have to buy scaffolding. We are actually covering up an ugly gray for white. I too am planning on hanging photos in my stairwell and hall so looking forward to that post.
Great color & I can't wait to see the gallery wall. Thanks for sharing at the #HomeMattersParty 🙂
Hope this helps! White will look so bright and cheery!
Thanks! I can't wait to get it on the wall!
Thanks! 🙂
Hi Samantha! These are great tips! They will come in handy when we redo our stairs too. I love your table and chairs makeover as well! Beautiful job! Feel free to link up at On Display Thursday – love to see you there!
Stairways are the worst, this coming from a paint-hater, but we are painting ours soon too. Must buy a corner painter! That's genius.
I am so impressed! We have a really high entry way and stairway that needs to be painted. We got a quote for $400 but I would surely love to save that money. I'm going to show this to my husband and see if I can convince him that we can actually do it ourselves. Nice job!!
How high are your ceilings? Ours are 9 feet – will this still work? Would love to save the money!
I have been looking for an answer! We keep putting the hallway off because we thought we would need to put up scaffolding (which all the "how to" videos instruct) or hire someone $$$ I can't wait to give this tool a try. Thank You 🙂
I love the way you write — thanks for teaching me how to paint my tall stair ceilings and for the laughs.
Thank you so much for this post!!! I had a tall stairwell to paint and was worried I’d need to hire a pro. I used your tips and it worked out perfectly! Easy peasy. Thank you for saving me so much $$$$!
YAY, you made my night! So glad it helped and you were able to do it yourself!!
I am trying to get my love bad for my house an have little budget but you have completely inspired to tackle my halls stairs and landing which have been annoying me for months!!!!! I love the black on the wood work??? Did you do that and the stairs yourself to??? Many thanks. Kate xx
I’m so glad this was inspiring for you! Makes my day! I painted the stairwell and hallway walls, but the previous homeowners had already painted the stair rails a glossy black. It has held up really well! I’m not sure when they did it, but we’ve owned the house for 4 1/2 years and they still look perfect! Hope that helps!
Hi question for you! Love your hallways color but I’ve seen it mentioned twice that you lightened it. Here you said 25% but in your post with your gallery wall you said by 75%. Do you remember which one it is. I love the lightness of it and want to do the exact color!
Sorry to be confusing! I lightened it by 25% to make it 75% strength. Hope that makes more sense! 🙂
my wife insists on paintbrushes and won`t allow rollers. I had to get close to the ceiling to remove old limewash under the modern paint. So 2 long ladders used as planks –very bungey and scary .–Then to make sure I did not fall 25 feet—- I wove a goalkeepers net across the stairwell made out of clothes lines .Very untidy but I could not fall through the holes .Ground floor ,first floor and second floor and I could see right down the gap .
SO glad I read this as I am contemplating doing our stairwell myself. What is the worst that could happen? You have inspired me to do this myself!!! Thanks for posting. 👏🏻
I know this is a very late comment but I have a similar situation with a stairwell in my home. Do you think the edger and corner tools would work well on textured walls?
So sorry, just now seeing your comment! I can’t say for sure, but I would think it would, you may just need to go in more of a back and forth motion to get into the texture. You may be better off doing the paintbrush taped to a paint pole trick in the corners, though, not sure! Sorry I’m not more help! Hope it works great for you!
I have been trying to find a solution on how to paint the ceiling on the stairwell. Thanks for this great idea and it will save me $$$. Happy painting/diy-ing. They say it’s a therapy.
Oh wow!! What a life saver ! I moved into an older townhouse yesterday and was having major panic at realizing I needed to finish painting before the new carpet installed this week. I started painting and rounded the corner to the staircase and had an “ohhhh nooooo” slow mo as i gazed up the impossible to reach stairway. i frantically googled “how to paint a stairway” and yours came up first. remembered seeing the gadget you recommended at walmart, so i’m changing out of my fashionista painting outfit and running back to walmart to pick it up. thanks a ton!!!
Haha, I totally understand! Hope your painting project goes well!!
Hi Samantha! Thanks for these great tips. i have no more to hire some one to paint my stairwell. This is amazing
What extension pole length did you use? Your height looks similar to mine
you’ve made my day!! thank you so much for this wonderful post. I, too, don’t have the budget for a prof painter, and i am capable of doing it all except the high portion. great solution!
This post has saved my time. I am in the process of renovation and was looking for some creative tips to paint stairwell. Thanks a lot!
Are these available in Britain or just the states
Samantha! thank you so much for this post. the last area I had to paint in the house I bought three years ago was the dreaded stairwell. I didn’t want to pay for something i knew i could do myself – and you showed me how! I went in knowing it would be tedious and I’d need patience. my stairwell has solid walls on each side so it was unforgiving in places maneuvering the pole at its highest point. however it turned out great!
everyone finds something that works for them. Here are two things that really helped me.
1. i knew that the edger would be difficult and event though i went slowly and used a good pressure, it still skipped or didn’t get close enough. However, i swapped it out for the corner edger. Wow! was that easier. it was more stable, i could apply greater pressure and it was more versatile as i could turn it different ways depending on the angle i needed to be at. using that tool made edging a breeze!
2. i loved the duct taping the brush idea. that’s so cool! my issue was that the duct tape would get wobbly and i couldn’t put the pressure i needed on it. so, i used packing tape which was SOLID! TOTALLY DIDN’T MOVE. I ALSO USED THIS TECHNIQUE ON MY SCRAPER, WHICH I USED AFTER I DISCOVERED THE INEVITABLE DRIPS WAAAAAY UP THERE.
THANK YOU AGAIN, EVER SO MUCH FOR AN EXCELLENT POST!
Oh my goodness, I LOVE these tips! Thank you so much for sharing! I need to do the stairwell in our detached garage and will try out the edger and packing tape ideas!! I’m so glad it turned out great and you were able to get it done without hiring it out! YAY!
my eyes are bleary from painting. i had no idea i hit the caps. swear i’m not screaming at you!
Haha, it happens all the time! It’s because of my blog design font, not your fault! 😉
Yes and one more thing I forgot: since I knew that getting way up to the moulding (which i painted with the brush on an extension pole — thank you!) with the edger might be a little irregular, I splurged and did two coats of the color rather than using primer first as I typically do. i figured if i missed a spot, I’d rather have it the same color than have little bits of primer that I would have to go back and cover. My stairwell is thankfully on the dim side since there’s only the hall light so I could get away with some mistakes at the top!
Thank you ever so much for posting this. I shall look for a Shur-line edger at my local hardware store. I just put a primer up there and it isn’t pretty. I duct-taped my paint brush to get into the edges but I didn’t know how to edge for the ceiling paint job which will be coming up. I have a 2 ft, square section that I can’t reach with the 10 ft. ladder. Now hopefully I can paint with relative ease and safety. We have a bi-level/high ranch stairwell with 1 set going up and one down.
Thank you for some helpful hints for painting above the stairs. This is probably a silly question but I’ll ask anyway. Since you are working in a narrow confined space with a long pole, how were you able to put more paint on your roller/brush/edger?
did you start from the bottom to the top or the top to the bottom. Want to try this and save some$$$$
So sorry I missed your comment! I trimmed everything out, then did top to bottom. Hope that helps!
Thanks
great idea!
Did you do any prep on the walls? I have a similar problem but my main issue is that I need to remove some old flaking paint and the clean the walls prior to paining.
No, we didn’t need to do any wall prep other than patching a couple nail holes. Hope your project goes smoothly!
Hi Samantha, THese are awesome ideas for painting high stairwells. I have a lower and upper hallway (20 feet high) to paint. I’m going to have the painter give me an estimate and then talk myself into doing it with your tips. Bob
Thanks so much!
5.5 years later, this posting is SO helpful!! So glad I stumbled across it! Thank you!!
Yay, so glad!
Thanks for this, have managed extremely high stairwell which had been left til last & Id been dreading, taped paintpad & brush to washing line extending pole as in covid lockdown in uk & it worked, super happy with the long overdue makeover, would send pic but no option. Thanks 😁
YAY! So glad it was helpful and you were able to get yours done! High fives!